Tennessee State University
Faculty Web Area
Newbie Help |
Home > Web Page Form using Microsoft FrontPage: Sending Data to Email
Problem Description: In this example we will create an e-commerce
page that allows visitors to submit a purchase order to a fictional company
for widgets. We do not have the capability to submit credit card orders to a
payment gateway, but we can take orders and email to the service center for
processing. All of the necessary information to building the form has been
supplied by the marketing department.
Our page will need the following elements:
* Page with Company Logo
* Form with:
-Product Names
-Images of the Products
-Product Prices
-Product Descriptions
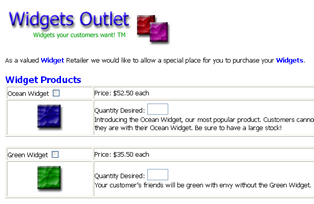
Click the image to the left to view our completed form.
Building the form:
1. It is best to plan your form on paper
before moving to the web. Plan to display your form in a tabular format. The
borders of your tables can be made invisible.
2. All of these items will be contained in a form. The form should be
created first.
To create a form:
a. Go to the menu Insert | Form > Form.
b. You should see a dotted box in your Normal window area. It will contain a
submit and reset button for you.
3. It is often easiest to start with the table being built first, then move
to the elements that will contain it. The table will be created inside the
form dotted box above the submit and reset buttons.
To create a table that will resemble the visual above:
a. Go to the menu Table | Insert > Table.
b. From the Insert Table Dialog box you can select how many rows and columns
you want. In the image you can see that the first table, from the two you
can see, has two rows and two columns. The border is set to 1. The option
show both cells and table borders is selected.
c. Click ok. You should see this:
4. At this point you can enter text and form items into the table:
| Ocean Widget |
Price: $52.50 each |
| [Picture Here] |
Quantity Desired:
Introducing the Ocean Widget, our most popular product. Customers cannot
express how happy they are with their Ocean Widget. Be sure to have a
large stock! |
a. To add the checkbox: Put the mouse cursor
right next to the ocean widget text and click there to designate it as the place
where the checkbox will go. Then select Insert | Form > Checkbox.
b. To add the textbox: Put the mouse cursor right next to the Quantity Desired
text and click there to designate it as the place where the textbox will go.
Then select Insert | Form > textbox.
c. You should assign a name and value for each form item. Right click the
checkbox and textbox to select the Form Field Properties menu item. Type in a
name without spaces. The name should be easy for you to understand, but not too
long.
5. Repeat the actions from steps 3-4 to complete the form. Make sure all
your form elements are inside the dotted box of the form.
6. Now you are ready to configure your form to send the data to a
particular destination.
7. To view the configuration for the form, right click anywhere within
the dotted box. The popup menu will have a Form Properties option, select it.
You will see a view similar to the image below.
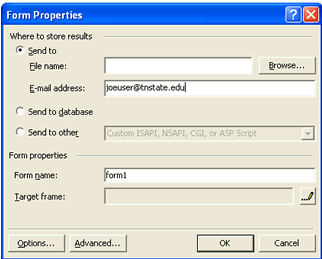
Form Properties Dialog Box
8. You have several optional where you can send the form data. One of
them is to a particular email address. Put the email address where you want the
form data sent in the Email address box.
9. Press the Options button in the Form Properties to see the Saving
Results Dialog Box below.
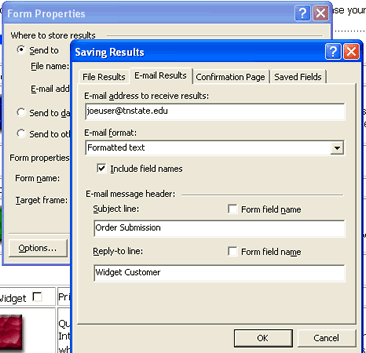
Saving Results Dialog Box
10. In the Saving Results area you enter how you want your form
processed. The important sections are subject line and reply-to line. The
subject line will show what will be in the subject area of the email you send.
If the user where the email is being decides to reply to email the address given
in the reply-to box will be listed.
11. Your form data is automatically setup in the Saved Fields tab (see
image below). If you want to include or exclude data select the appropriate
fields.
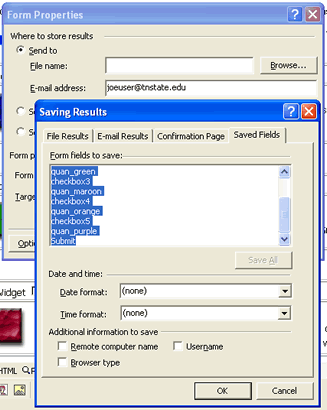
Saved Results Dialog Box, Saved Fields Tab
12. At this point you can add additional items to your email like the
remote computer's name, browser type, and username. The submission date and time
can be setup in a particular format.
13. If you would like the user to see a confirmation page that does not
look like the generic one generated by FrontPage extensions, select the
confirmation page tab and select the name of a page you create to send them to.
This is ideal so that customers know their information has been processed.
Your form is done! Now you should save your work
and test it to make sure the data is sent to you. Feel free to copy the
tutorial file and setup the form
without making the tables.
Tennessee State University
3500 John A. Merritt Blvd., Nashville, Tennessee 37209
Phone (615) 963-5000
© Copyright 2002, Tennessee State University, All Rights Reserved.
Tennessee State University is an AA/EOE Institution